-
시각화
여러 그래프로 데이터 나타내기
분석
-
탐색적 자료 분석(EDA, Exploratory Data Analysis)
-
확증적 자료 분석(CDA, Cofirmatory Data Analysis)
탐색적 자료 분석(EDA, Exploratory Data Analysis)
-
빠르게 자료의 특징을 찾는 행위
확증적 자료 분석(CDA, Cofirmatory Data Analysis)
-
느리더라도 확실한 결론을 내리는 행위
자료의 현시성
-
자료를 빠르게 그래프로 그리고 그래프를 통해 자료의 특징을 찾아내고 탐색하는 것
시각화
-
시각화를 통해 데이터의 특징을 찾아내는데 효과적
-
자료의 특징은 어떤 결론을 확증하는 증거
-
Report
탐색적 자료 분석의 정신이 필요
-
아무것도 보이지 않는 데이터를 가지고 조금씩 길을 찾아가는 정신
시각화를 해야 하는 이유 - 스토리텔링
R에서 그래프를 그리는 이유
-
빠르게 데이터를 탐색하기 위해 (EDA) => plot()
-
보다 정교한 데이터의 특징을 나타내기 위해 => ggplot2 패키지
-
Report 용 => rChart 패키지
고수준 그래프 함수
-
한번에 한 개만 실행되는 함수
-
plot(), barplot(), hist(), boxplot()
저수준 그래프 함수
-
고수준 그래프를 꾸며주는 함수
-
그래프 타이틀, X-Y축 이름, 그래프 색 등
plot()
-
변수의 형식에 따라 알아서 그래프 그림 => generic 함수
-
변수는 수치형이나 명목형 값이어야 함
# 데이터 로드
df <- read.csv('r-ggagi-data/example_studentlist.csv')
str(df)
'data.frame': 17 obs. of 8 variables: $ name : Factor w/ 17 levels "강수친","김길동",..: 2 12 17 6 10 7 1 14 13 9 ... $ sex : Factor w/ 2 levels "남자","여자": 1 2 1 1 2 2 2 2 1 1 ... $ age : int 23 22 24 23 20 21 22 23 23 22 ... $ grade : int 3 2 4 3 1 2 1 1 3 2 ... $ absence : Factor w/ 2 levels "무","유": 2 1 1 1 2 1 1 1 1 1 ... $ bloodtype: Factor w/ 4 levels "A","AB","B","O": 4 2 3 2 1 4 4 1 3 3 ... $ height : num 165 170 175 182 168 ... $ weight : num 68.2 53 80.1 85.7 49.5 52 45.3 55 64.2 61.3 ...# 변수 1개 plot(df$age) # 첫 번째 행부터 마지막 행까지 산점도로 표시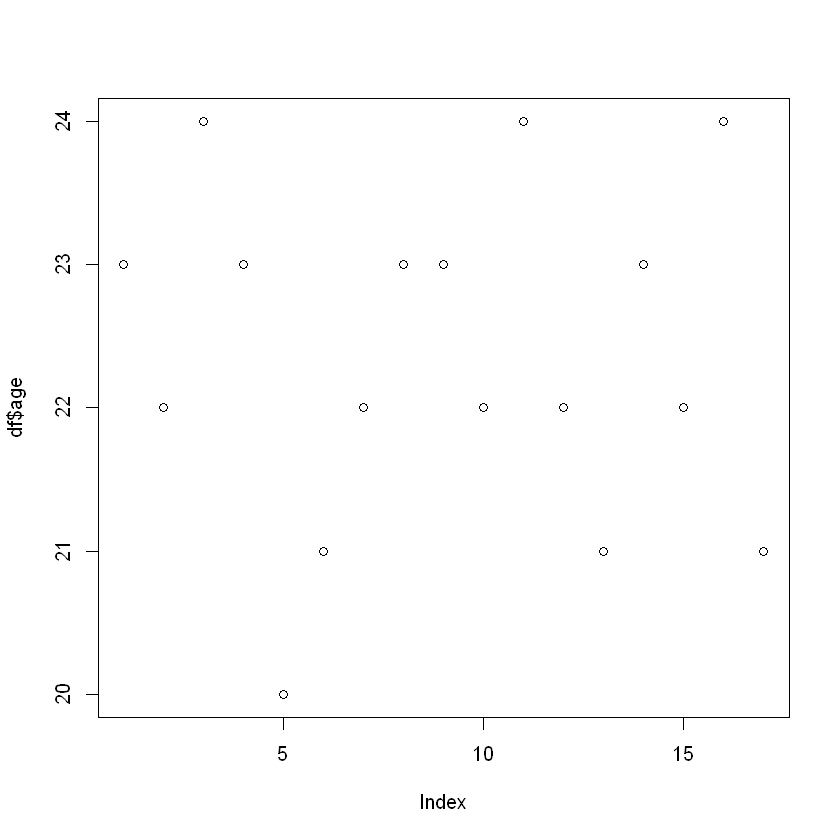
변수 1개일 때 산점도 그래프 # 변수 2개 - 상관 관계 plot(df$height, df$weight)
변수 2개일 때 상관관계 그래프 # 변수 2개 - 상관 관계 - 종속변수(y) ~ 독립변수(x) plot(df$height ~ df$weight)
변수 2개일 때 상관관계 그래프-2 # 수치형 변수, 명목형 변수 1 남자, 2 여자 plot(df$height, df$sex)
자료형태에 따른 그래프1 # 명목 형 변수, 수치형 변수 1 남자, 2 여자 plot(df$sex, df$height)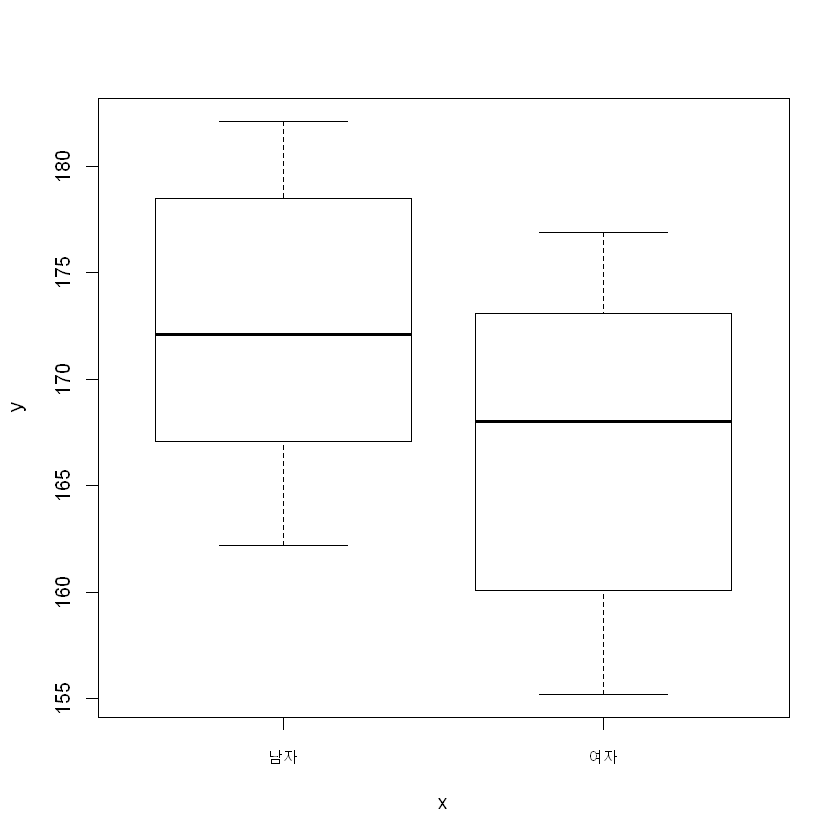
자료형태에 따른 그래프2 # 수치형 변수, 명목형 변수 1 남자, 2 여자 plot(df$height~ df$sex)
자료형태에 따른 그래프3 # 명목 형 변수~ 수치형 변수 1 남자, 2 여자 plot(df$sex~ df$height)
자료형태에 따른 그래프4 # 데이터 프레임 넣기 df2 <- data.frame(df$height, df$weight) plot(df2)
데이터 프레임으로 그린 그래프 # 변수 하나하나가 차원임 3차원은 못만들어서 관련된 2차원 그래프 여러개 작성 df3 <- data.frame(df2, df$age) plot(df3)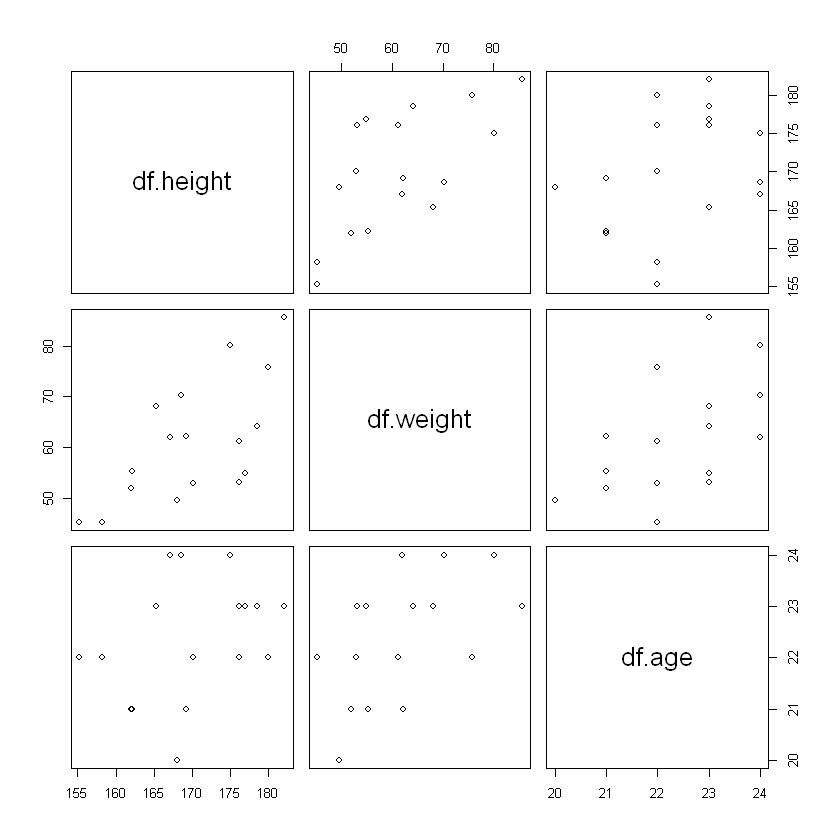
2차원 그래프 여러개 # 데이터 프레임 넣기 plot(df)
변수 갯수에 맞춰 그래프 작성됨 # 성별 별도 표시 plot(df$weight~df$height, pch=as.integer(df$sex))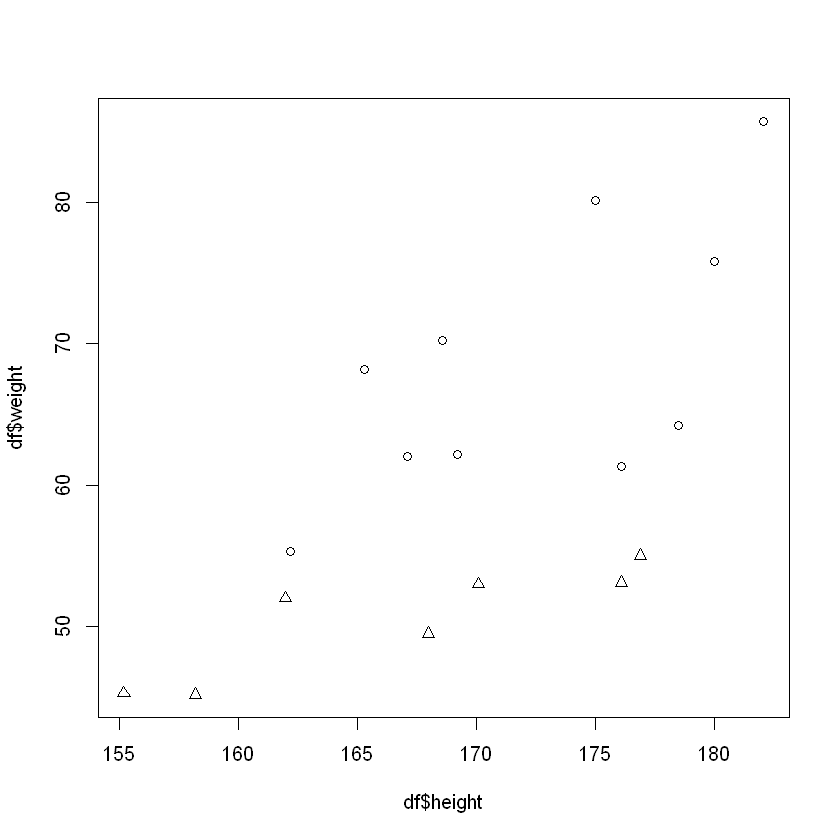
성별에 따른 키와 몸무게 그래프 # 성별 별도 표시 - 레전드 추가 plot(df$weight~df$height, pch = as.integer(df$sex)) legend('topleft', c('man', 'woman'), pch=df$sex)
성별에 따른 키와 몸무게 그래프에 레전드 추가(좌측상단)
조건화 그래프 coplot()
-
명목형 변수 보기 편함
# 성별에 따른 키와 몸무게
coplot(df$weight ~ df$height | df$sex)
성별에 따른 키와 몸무게 분리된 그래프 # 저수준 그래프 함수 # 제목 달기 - ann = F 모든 라벨 삭제 plot(df$weight ~ df$height, ann=F) title(main = '몸무게와 키의 상관관계') title(ylab = '몸무게') title(xlab = '키') grid() # 격자 추가 abline(v=mean(df$height), h=mean(df$weight), col='red')
title로 제목, 축이름 변경
빈도수 그래프 barplot()
blood_type <- table(df$bloodtype)
blood_type
A AB B O 4 3 5 5barplot(blood_type) title(main = '혈액형 빈도수') title(xlab = '혈액형') title(ylab = '빈도수')
혈액형 빈도수 그래프 # 그룹별 평균 height_blood <- tapply(df$height, df$bloodtype, mean) height_blood- A
- 169.075
- AB
- 177.4
- B
- 171.28
- O
- 165.14
barplot(height_blood, ylim = c(0, 200))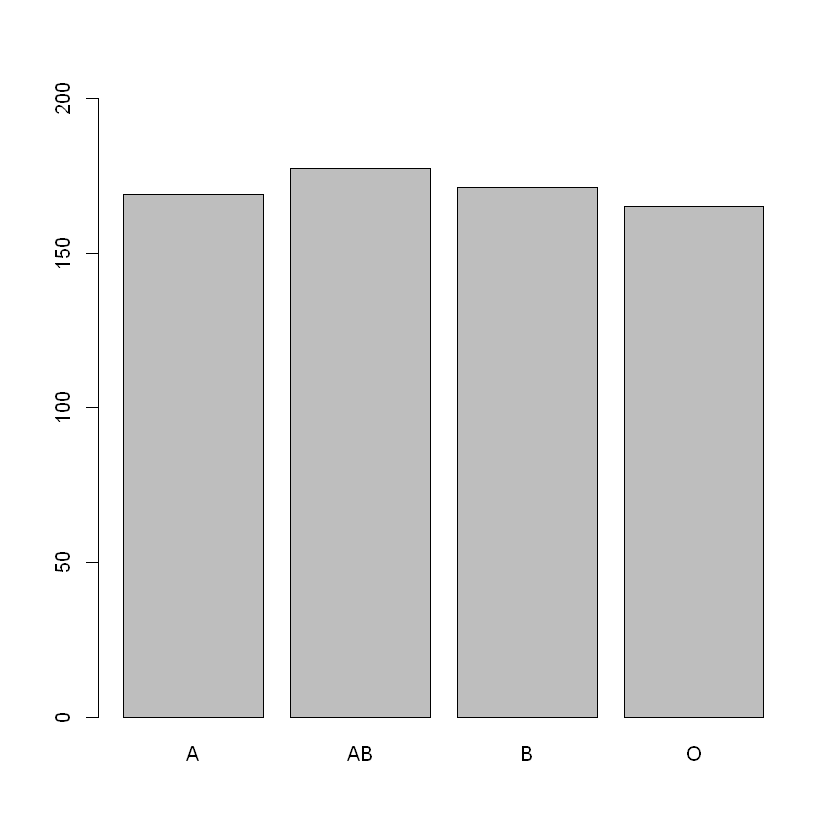
혈액형별 평균 키 그래프, y축 값 변경 # 빈도수는 plot() 바로 그릴 수 있음 plot(df$bloodtype)
plot()으로 바로 그린 도수 그래프
boxplot()
boxplot(df$height)
boxplot() 그래프 # levels 별 boxplot(df$height ~ df$bloodtype)
level별 boxplot() 그래프 subset(df, subset=(df$bloodtype == 'O'))name sex age grade absence bloodtype height weight 1 김길동 남자 23 3 유 O 165.3 68.2 6 박미희 여자 21 2 무 O 162.0 52.0 7 강수친 여자 22 1 무 O 155.2 45.3 11 박수호 남자 24 4 유 O 167.1 62.0 14 이희진 여자 23 3 무 O 176.1 53.1
hist()
-
x축은 반드시 수치형 연속형 변수
-
계급을 정하고 계급의 도수를 그래프로 나타낸 것 - 확률밀도함수 vs 확률질량함수
-
확률 1
-
상대도수밀도 = 상대도수 / 계급(구간)
hist(df$height)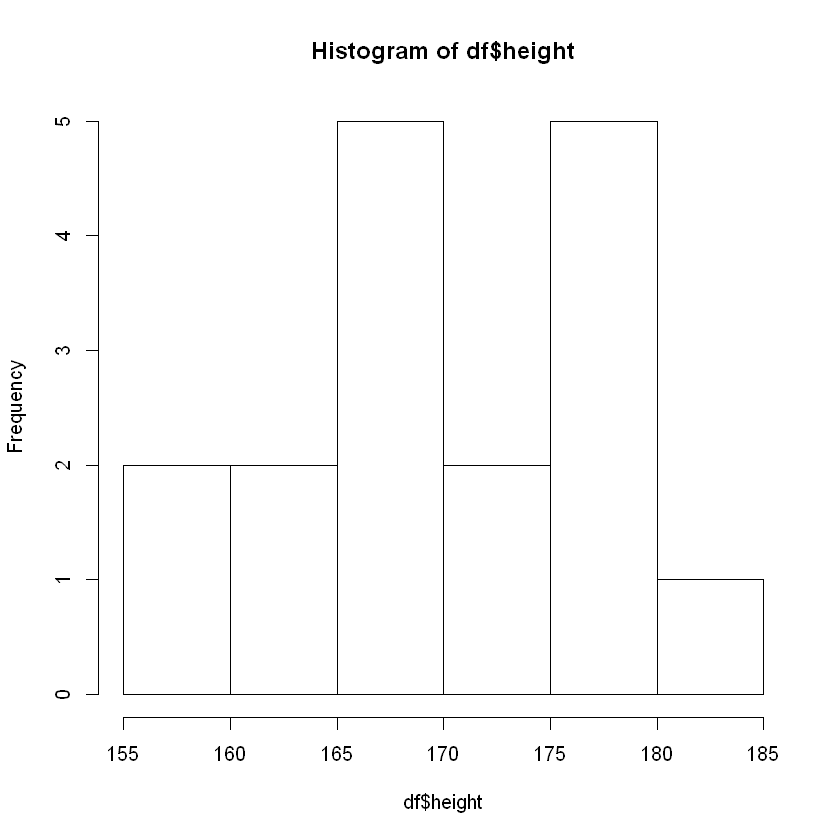
hist() 그래프 # 막대수 조정 hist(df$height, breaks = 10)
breaks 옵션으로 막대 갯수 변경 # 상대도수밀도 prob = T, 곡선 추가 lines # 바의 면적이 상대도수 hist(df$height, breaks=10, prob=T) lines(density(df$height))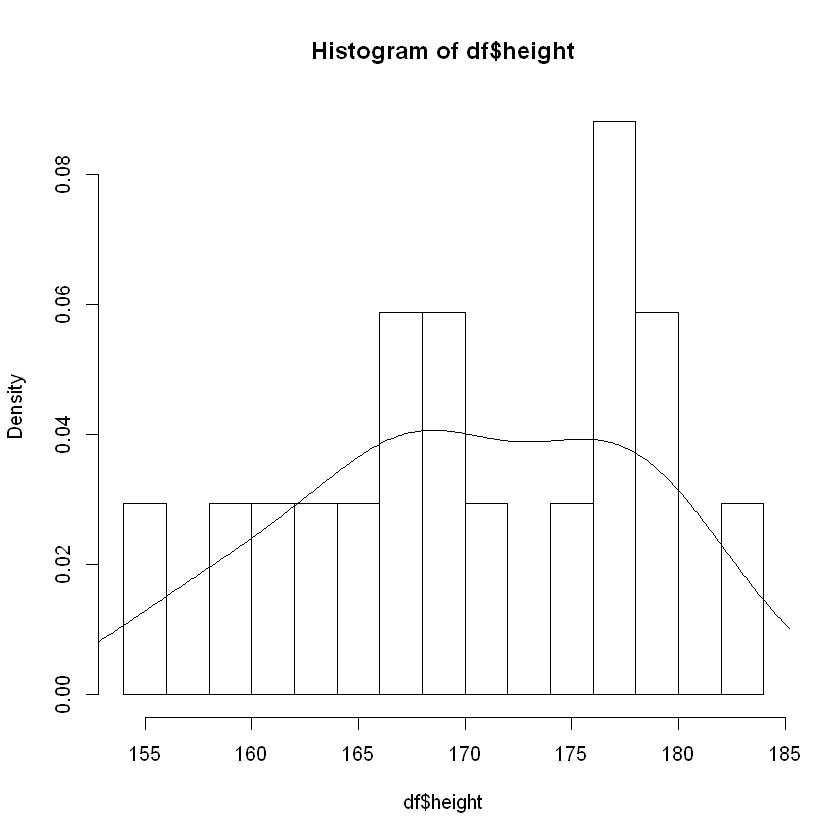
곡선 추가된 hist() 그래프 # 계급 7간격 만들기 break_point <- seq(min(df$height), max(df$height)+7, by=7) hist(df$height, breaks = break_point)
# 계급 수동 설정 => 상대밀도함수(Density)로 바뀜
diff_point <- c(min(df$height), 165, 170, 180, 185)
hist(df$height, breaks=diff_point)
한화면에 여러개 그래프 그리기
par(mfrow = c(2,3))
plot(df$weight, df$height)
plot(df$sex, df$height)
barplot(table(df$bloodtype))
boxplot(df$height)
boxplot(df$height ~ df$bloodtype)
hist(df$height, breaks = 10)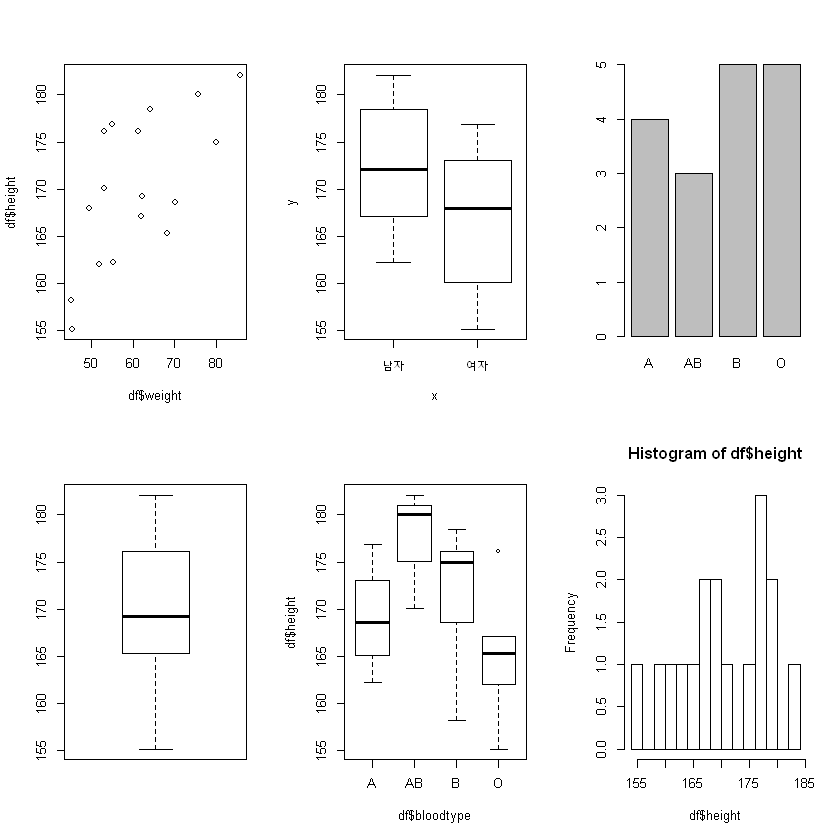
한 화면에 그래프 여러개 그리기 # 다시 1개씩 그리기 par(mfrow = c(1,1))넘겨가며 그래프 보기
plot(df$weight~df$height + df$age + df$grade + df$absence + df$sex)
# jupyter notebook 에서 실행하면 결과창에 스크롤바로 보임

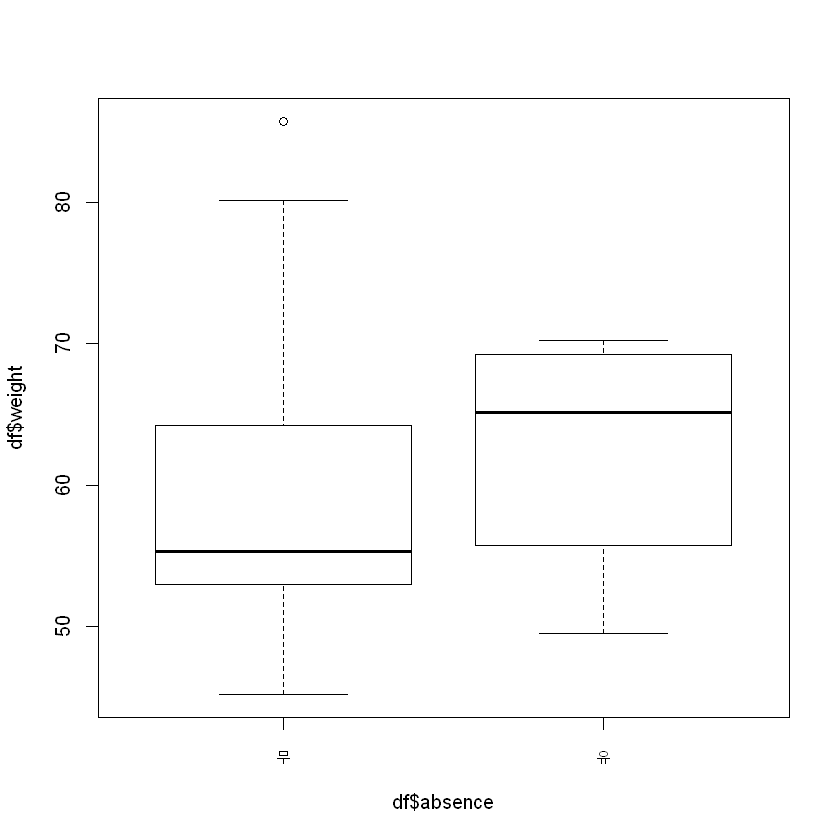

R 기본 그래프 겹처 나타내기
-
linse()를 이용해서 라인 그래프만 겹칠 수 있음
# 시계열 변수 임의로 만들기
runif(30) # 난수 발생
round(runif(30)*100) # 소수점 처리
TS1 <- c(round(runif(30)*100))
TS1
TS2 <- c(round(runif(30)*100)) TS2# 자료 정렬 TS1 <- sort(TS1, decreasing=F) TS2 <- sort(TS2, decreasing=F) TS1 TS2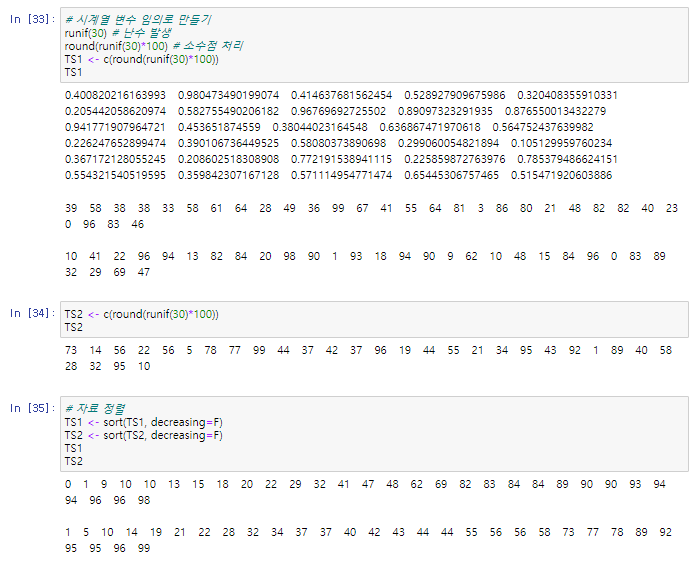
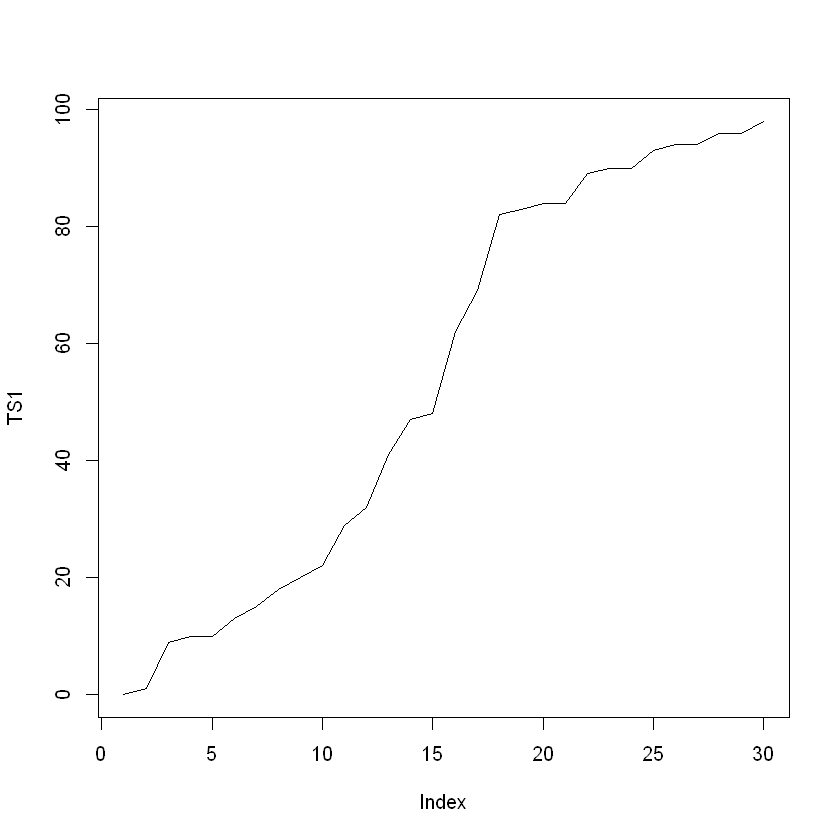
자료 정렬 plot(TS1, type='l')
type = 'l' 으로 그린 그래프(L) plot(TS1, type='l') lines(TS2, lty='dashed', col='red')
TS2 그래프에 추가 x1 <- seq(1,100,1) y1 <- dbinom(x1, 100, 0.25) # dbinom(v,n,p) B(n,p)이항 분포 함수 값 만들기 head(y1)- 1.06906739512716e-11
- 1.76396120195983e-10
- 1.92075775324516e-09
- 1.55261251720649e-08
- 9.93672011012162e-08
- 5.24438005811969e-07
x2 <- seq(1,50,1) y2 <- dbinom(x2, 50, 0.5) # dbinom(v,n,p) B(n,p)이항 분포 함수 값 만들기 head(y2)- 4.44089209850064e-14
- 1.08801856413266e-12
- 1.74082970261225e-11
- 2.04547490056939e-10
- 1.88183690852383e-09
- 1.41137768139287e-08
plot(x1, y1, type='h', ylim=c(0, 0.15), xlim=c(0, 60))
lines(x2, y2, col='red')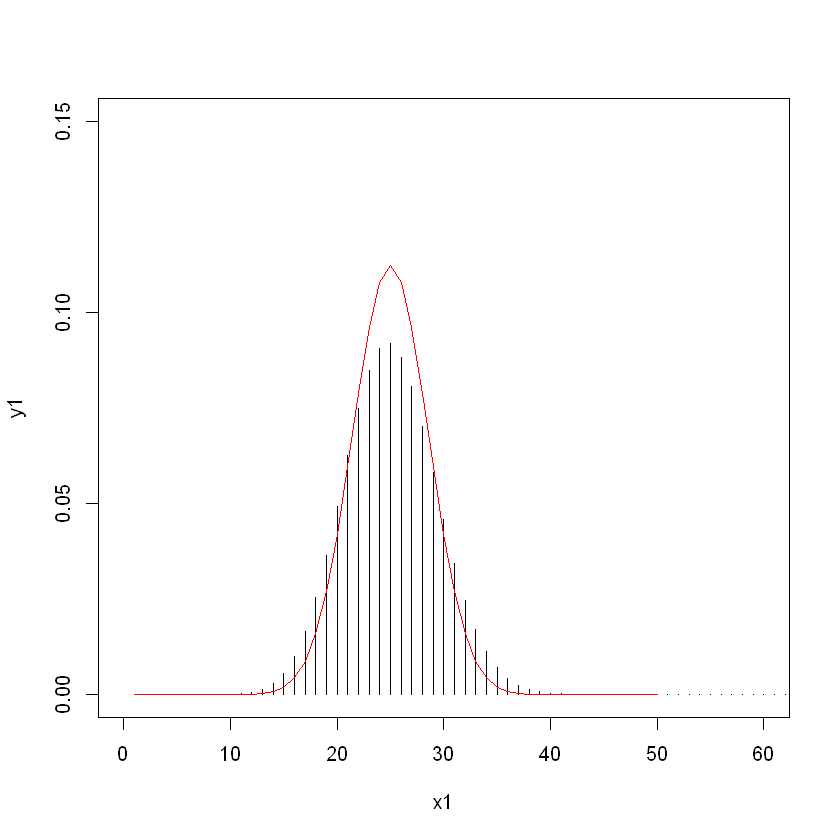
이항 분포 함수 그래프
정교한 시각화로 분석하기(ggplot2)
-
객체에 담아 재사용 가능, plot() 같은 함수는 변수에 담아 재사용 불가
library('ggplot2')
library('ggthemes')
g1 <- ggplot(data=diamonds, aes(x=carat, y=price, colour=clarity)) g2 <- geom_point() g3 <- theme_wsj()g1+g2+g3
g1, g2, g3 변수에 담아서 실행 # 테마만 바꾸기 g1 + g2 + theme_bw()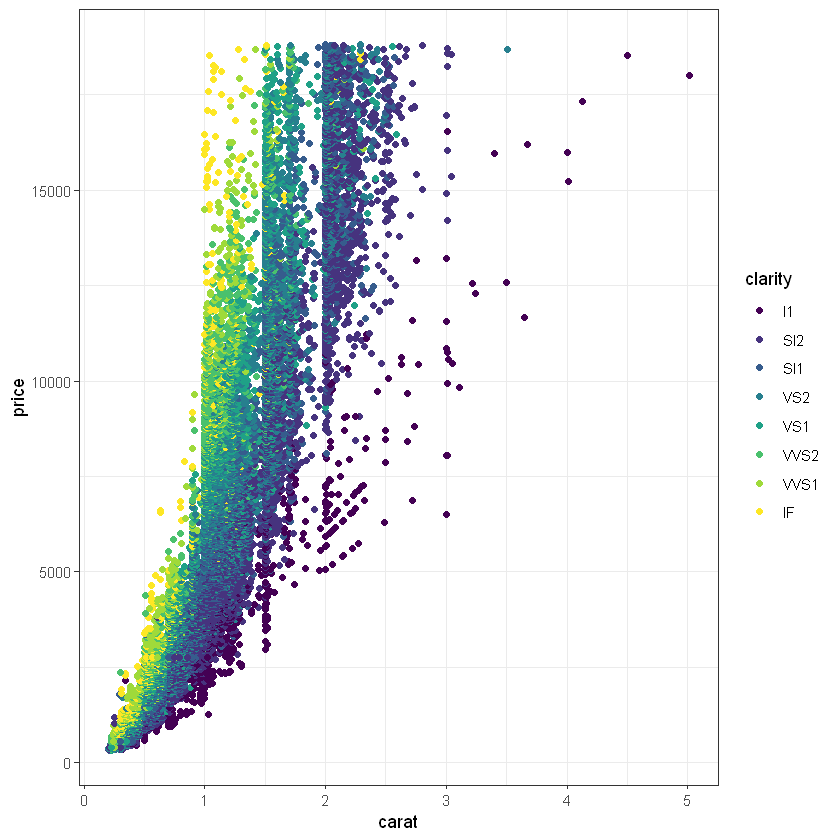
theme_wsj() => theme_bw()
ggplot()
-
데이터 x, y축, colour등 그래프 요소에 매핑하는 일
-
미적 요소 매핑(aesthetic mapping) => aes()
geom()
-
그래프 종류 선택
-
기하객체(geometric object) 함수, 점이나 선을 기하객체라 함
# 데이터 로드
df <- read.csv('r-ggagi-data/example_studentlist.csv')
g1 <- ggplot(df, aes(x=height, y=weight, colour=bloodtype))g1 + geom_point()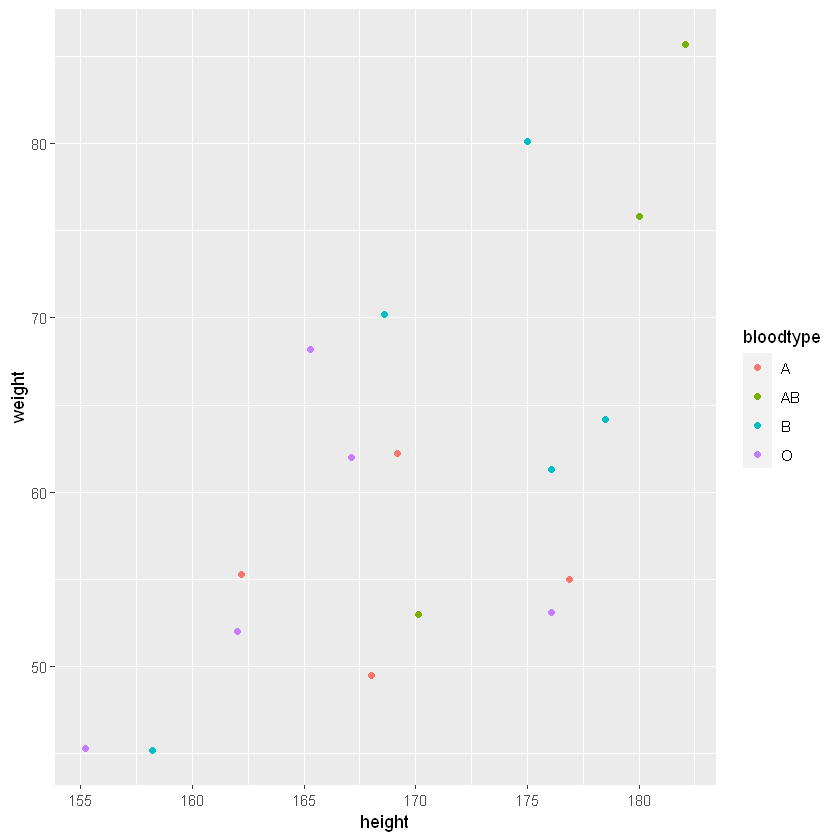
point로 표시한 그래프 g1 + geom_line()
line으로 표시한 그래프 g1 + geom_point() + geom_line()
point + line g1 + geom_line(aes(colour=sex)) + geom_point(size=10)
성별끼리 묶어서 표시한 그래프
facet_grid() - 명목형 변수를 기준으로 별도 그래프 그리기
g1 + geom_point(size=10) + geom_line(size=1) + facet_grid(.~sex) # 성별 독립변수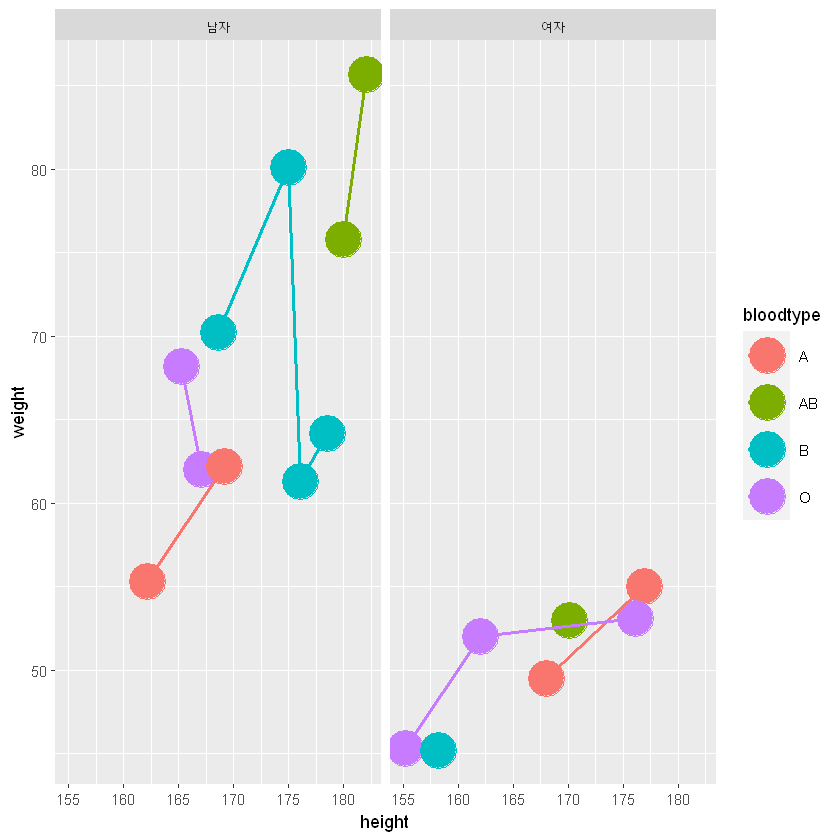
성별(열)을 기준으로 그린 그래프 g1 + geom_point(size=10) + geom_line(size=1) + facet_grid(sex~.) # 성별 종속변수
성별(행)을 기준으로 그린 그래프 # y축 범위(scale) 각각 맞게 처리 g1 + geom_point(size=10) + geom_line(size=1) + facet_grid(sex~., scale='free') # 성별 종속변수
scale에 맞춘 그래프 # y축 scale 적용 안됨 g1 + geom_point(size=10) + geom_line(size=1) + facet_grid(.~sex, scale='free') # 성별 독립변수
y축에 scale적용 안됨 # y축 scale 적용 g1 + geom_point(size=10) + geom_line(size=1) + facet_wrap(~sex, scale='free') # 성별 독립변수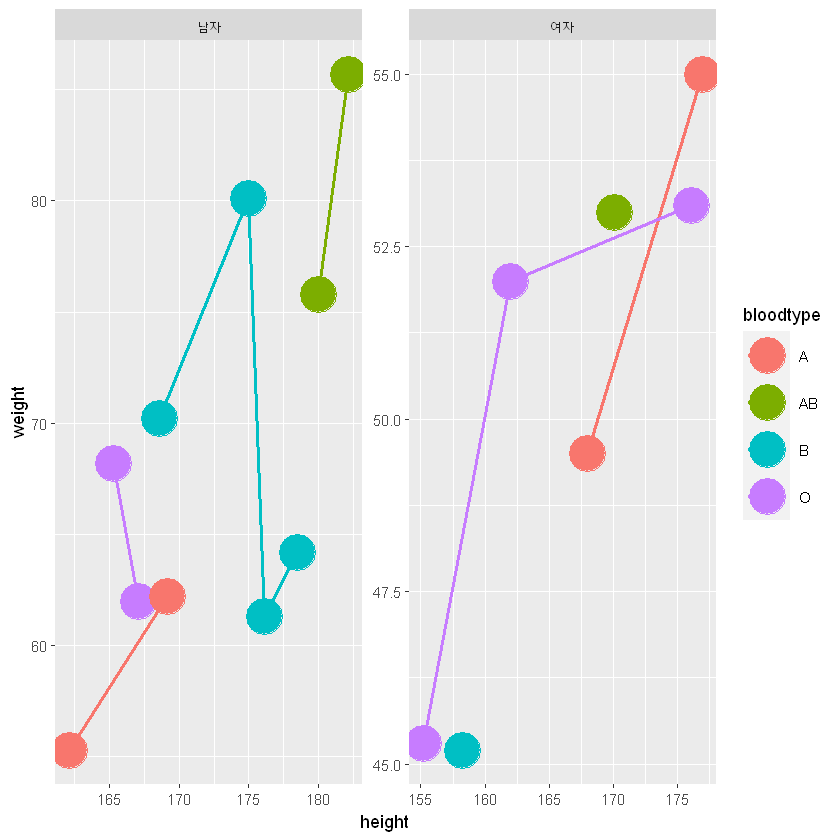
facet_wrap()으로 scale 설정된 그래프 # facet_grid() - 명목형 변수들의 level 별 그래프를 보여주는 목적 g <- ggplot(mpg, aes(displ, hwy)) # 배기량, 고속도로연비 산점도 g + geom_point()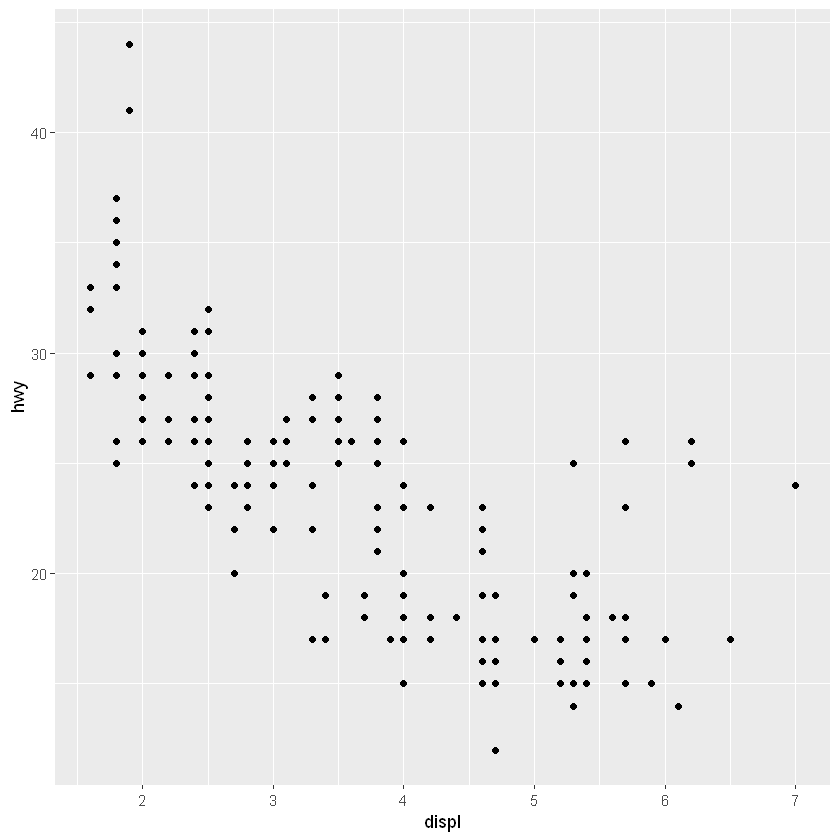
배기량, 고속도로연비 산점도 # 차량 종류에 따른 배기량, 고속도로연비 보기(그룹) g + geom_point() + facet_grid(.~class)
차종으로 분류한 그래프 # 종속변수 추가 g + geom_point(alpha=.3) + facet_grid(cyl~class, scale='free')
종속변수가 추가된 그래프 # 종속변수 추가 - 각각의 그래프를 모아서 보기 위함 g + geom_point(alpha=.3) + facet_wrap(cyl~class, scale='free')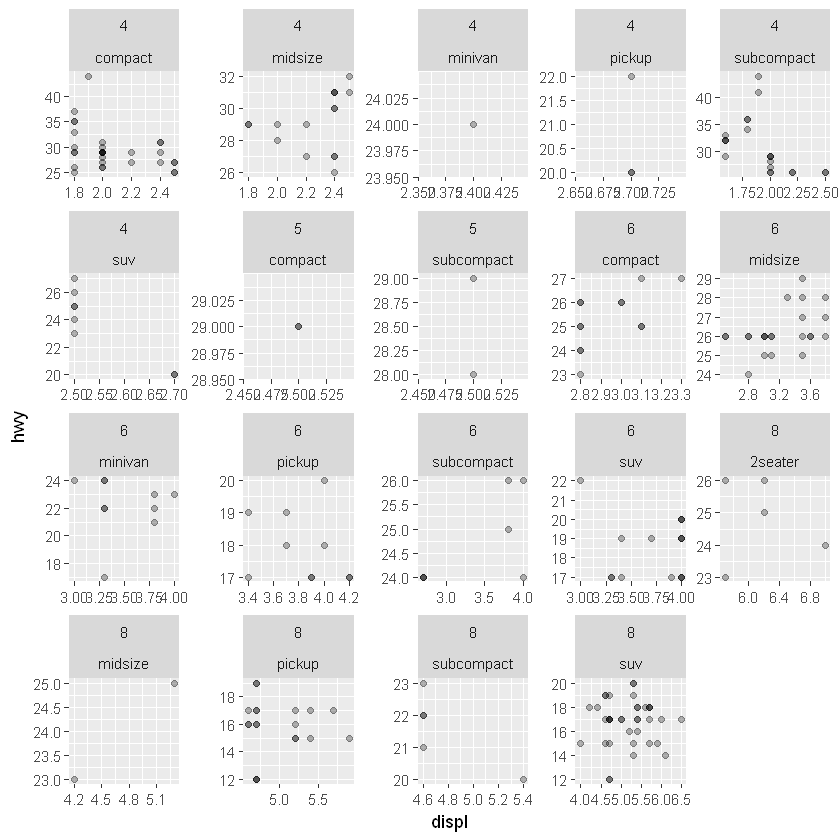
차종별로 모아본 그래프
바 그래프 geom_bar()
ggplot(df, aes(x=bloodtype)) + geom_bar()
bar 그래프 # level 별 색 넣기 - fill ggplot(df, aes(x=bloodtype, fill=sex)) + geom_bar()
fill 옵션으로 bar의 색상 변경 # Level 별 색 넣고 각각 바로 표시 - position ggplot(df, aes(x=bloodtype, fill=sex)) + geom_bar(position = 'dodge')
position = 'dodge'로 분리 # Level 별 색 넣고 가각 바로 표시 - position ggplot(df, aes(x=bloodtype, fill=sex)) + geom_bar(position = 'identity') # 누적없이 겹치기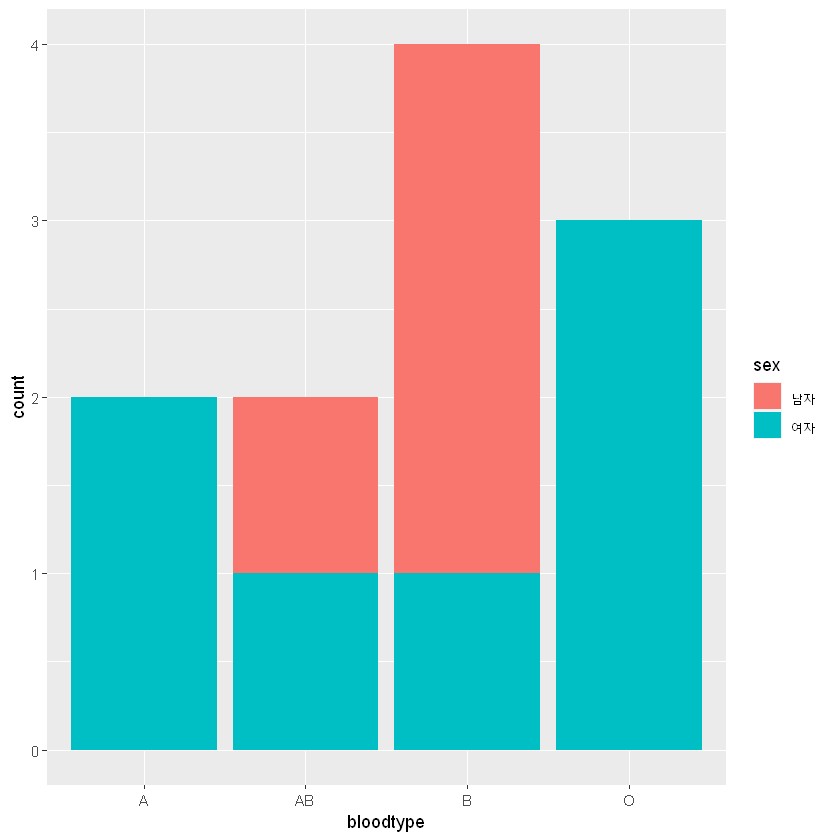
누적되지 않고 겹쳐서 표시한 그래프 # Level 별 색 넣고 가각 바로 표시 - position ggplot(df, aes(x=bloodtype, fill=sex)) + geom_bar(position = 'fill') # 비율로 표시
비율로 표현 # 막대 넓이 바꾸기 - width ggplot(df, aes(x=bloodtype, fill=sex)) + geom_bar(position = 'dodge', width=0.5)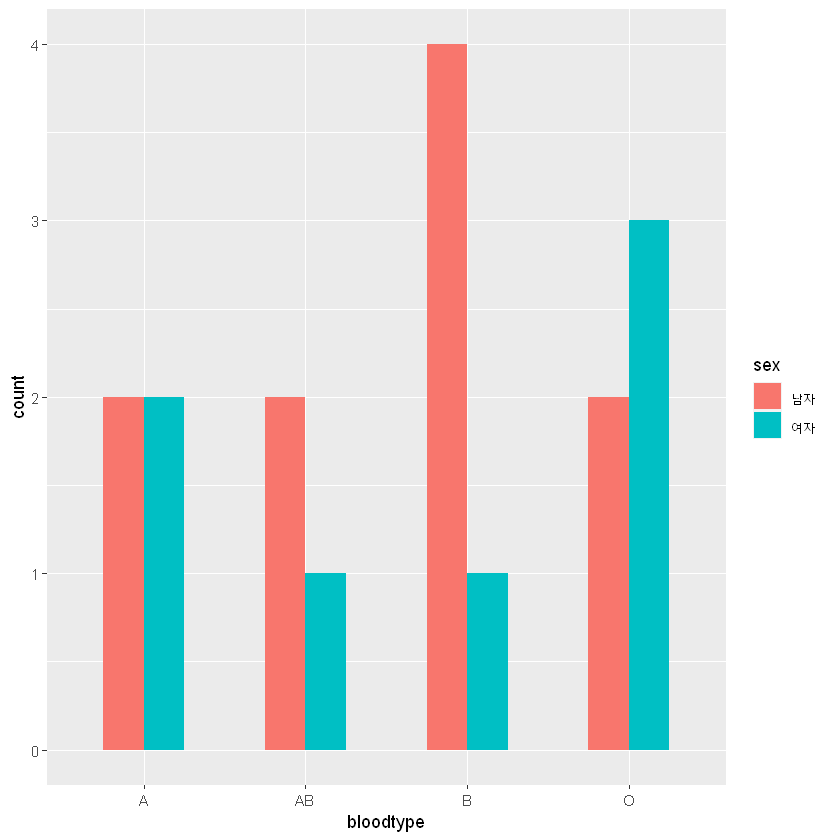
막대 넓이 수정 # 도수 값 말고 계산된 값 사용하기 - 혈액형별 키 평균 height_mean <- tapply(df$height, df$bloodtype, mean) height_mean- A
- 169.075
- AB
- 177.4
- B
- 171.28
- O
- 165.14
# 변수명 주기 df2 <- data.frame(height_mean) df2$bloodtype <- rownames(df2) rownames(df2) <- NULLdf2height_mean bloodtype 169.075 A 177.400 AB 171.280 B 165.140 O # stat = 'identity' 값 그대로, 생략시 stat = 'bin' 빈도수 표시 ggplot(df2, aes(x=bloodtype, y=height_mean, fill=bloodtype))+ geom_bar(stat='identity') + scale_fill_brewer() # 색 칠할 때 도와주는 함수 scale_fill_brewer(palette = '색상')으로 변경가능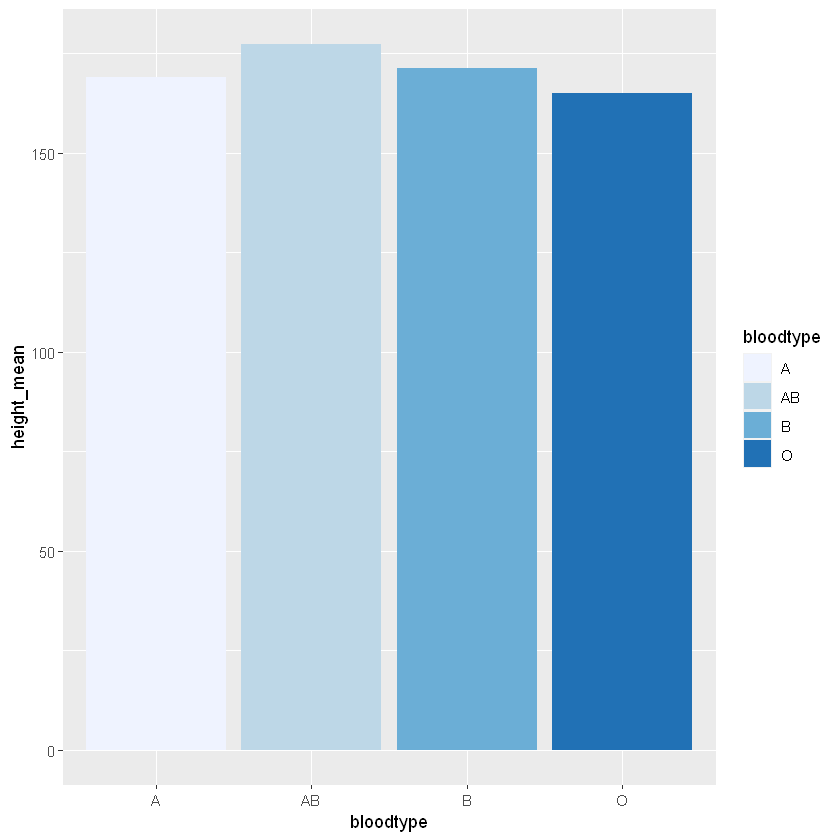
기본값 푸른색
히스토그램 - geom_histogram()
g1 <- ggplot(diamonds, aes(x=carat))# y축 계급 빈도수 g1 + geom_histogram(binwidth = 0.1, fill = 'orange')
# 예약어 - ..count.. 도수 default
g1 + geom_histogram(aes(y=..count..), binwidth = 0.1, fill='orange')
# 예약어 - ..ncount.. 표준화된 도수
g1 + geom_histogram(aes(y=..ncount..), binwidth = 0.1, fill='orange')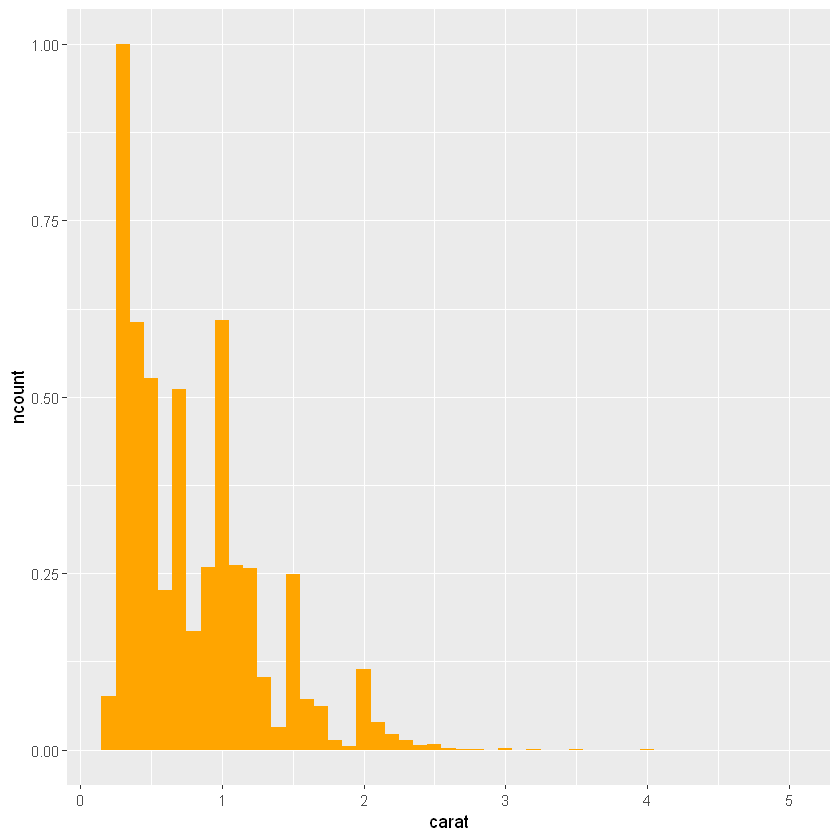
# 예약어 - ..density.. 밀도
g1 + geom_histogram(aes(y=..density..), binwidth = 0.1, fill='orange')
# 예약어 - ..ndensity.. 표준화된 밀도
g1 + geom_histogram(aes(y=..ndensity..), binwidth = 0.1, fill='orange')
# 그룹별로 그리기 - facet_grid
g1 + geom_histogram(binwidth = 0.1, fill='orange') +
facet_grid(color~.) # color 변수 Level 별로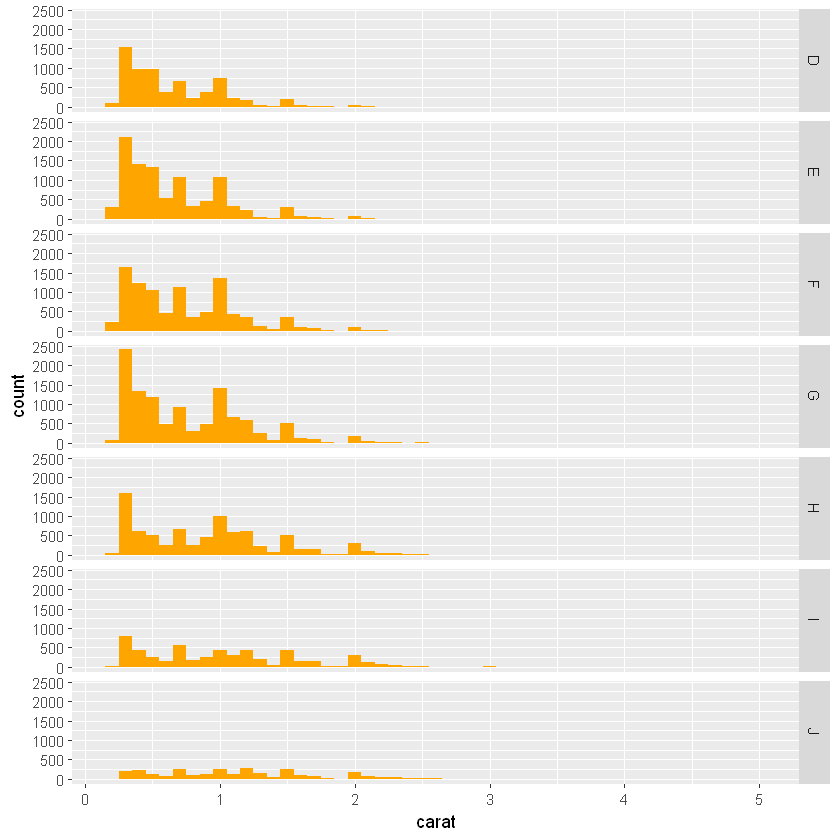
# 그룹별로 그리기 - 축변경 facet_grid - scales='free'
g1 + geom_histogram(binwidth = 0.1, fill='orange') +
facet_grid(color~., scales='free') # color 변수 Level 별로
# level 별로 겹쳐 보이기
g1 + geom_histogram(aes(fill=color), binwidth = 0.1, alpha = 0.5)
산점도 그리기 - geom_point()
# 데이터 로드
df <- read.csv('r-ggagi-data/example_studentlist.csv')
head(df)
name sex age grade absence bloodtype height weight 김길동 남자 23 3 유 O 165.3 68.2 이미린 여자 22 2 무 AB 170.1 53.0 홍길동 남자 24 4 무 B 175.0 80.1 김철수 남자 23 3 무 AB 182.1 85.7 손세수 여자 20 1 유 A 168.0 49.5 박미희 여자 21 2 무 O 162.0 52.0 g1 <- ggplot(df, aes(x=weight, y=height))g1 + geom_point()
# level 별 색상 주기
g1 + geom_point(aes(colour=sex), size=7)
# 점 모양 바꾸기 1
g1 + geom_point(aes(colour=sex, shape=sex), size=7)
# 점 모양 바꾸기 2
g1 + geom_point(aes(colour=sex, shape=bloodtype), size=7)
# colour  에 연속형 변수 넣기
g1 + geom_point(aes(colour=height, shape=sex), size=7)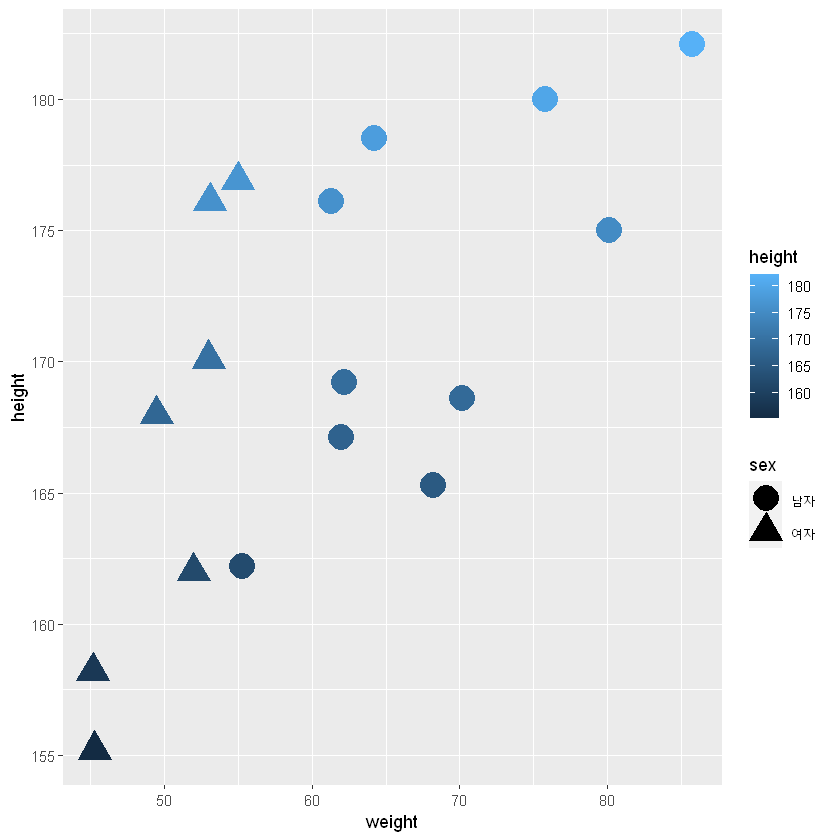
# size  에 연속형 변수 넣기
g1 + geom_point(aes(size=height, shape=sex), colour='orange')
# 산점도로 회귀분석의 그리기
g1 + geom_point(aes(colour=sex), size=7) +
geom_smooth(method = 'lm')
`geom_smooth()` using formula 'y ~ x'
# 점마다 이름 넣기 - geom_text()
g1 + geom_point(aes(colour=sex), size=7) +
geom_text(aes(label=name))
# 점마다 이름 넣기 - 위치조절 vjust, 글자색 colour
g1 + geom_point(aes(colour=sex), size=7) +
geom_text(aes(label=name), vjust=-1.5, colour='grey35')
theme() - 만들어져 있는 테마 사용
-
themes_wsj() : 월스트릿저널에서 많이 사용하는 그래프 스타일
'R' 카테고리의 다른 글
시각화 - D3.js (0) 2020.07.09 시각화 - 예제 (0) 2020.07.09 기술통계 - 실전 예제 (0) 2020.07.07 기술통계 (0) 2020.07.06 데이터 개념 예제로 이해하기 (0) 2020.07.06 -